To effectively identify tempered glass, you must inspect the pane for permanent safety stamps, polarized stress patterns, or specific surface imperfections caused by the thermal strengthening process. Using standard annealed glass in high-traffic zones creates a significant safety risk, as it shatters into dangerous, razor-sharp shards upon impact.
You may believe your current installations are secure, but without proper verification, you risk code violations and potential injury liabilities. Learning these simple identification methods empowers you to confirm the safety of your facility and ensures you only invest in high-performance materials.
Can You Find the Manufacturer’s Safety Stamp?
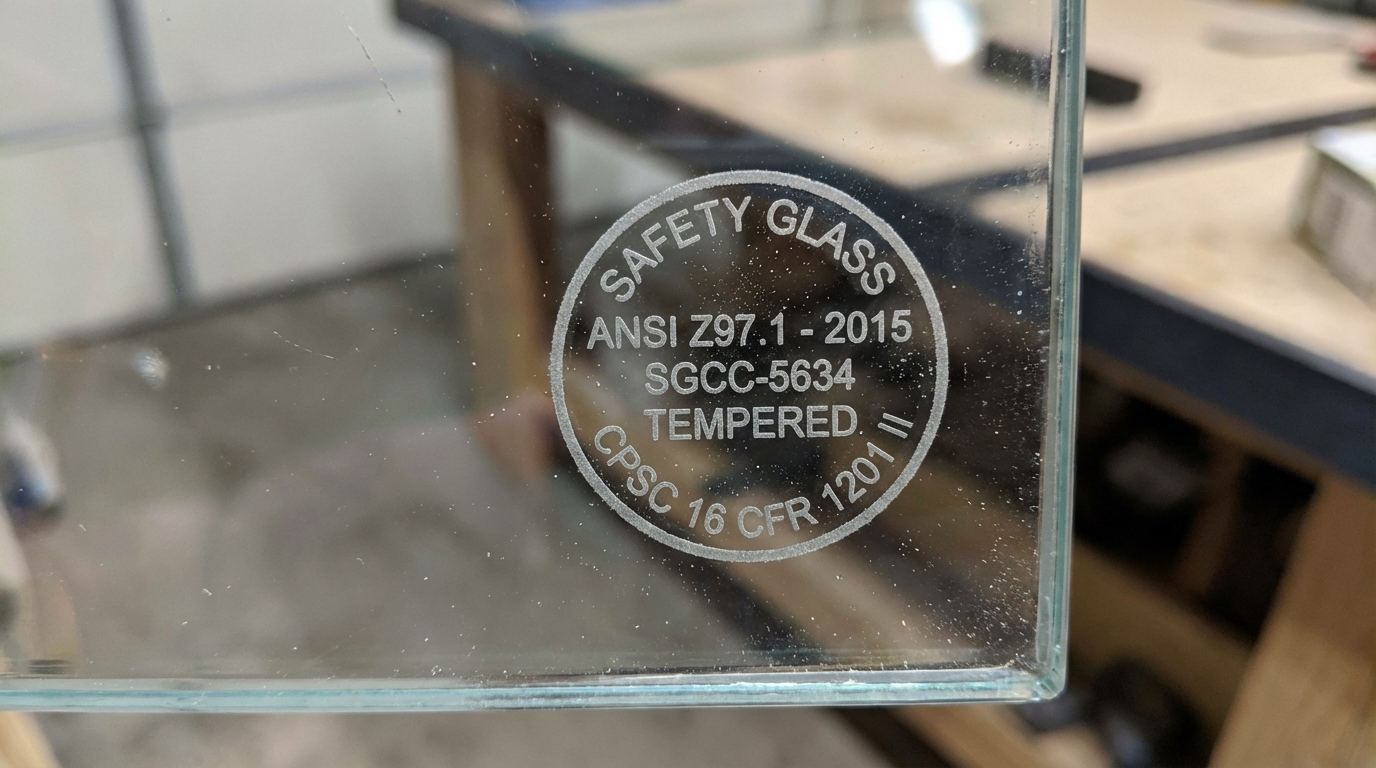
Most safety glass is legally required to feature a permanent etched mark, often referred to as a “bug,” in one of the corners. This mark serves as the primary way to identify tempered glass because it is applied before the heating process and cannot be removed.
Locating the Permanent “Bug” Mark
You should begin your inspection by checking all four corners of the glass pane for a small, sandblasted or acid-etched logo. This label typically contains the manufacturer’s name and the specific safety standards the glass meets, such as ANSI Z97.1 or 16 CFR 1201.
Wait, there’s more:
- Search specifically in the bottom or top corners near the frame.
- Use a flashlight at an angle if the etching is faint or dusty.
- Look for a circular or rectangular border surrounding the text.
Reading the Tempered Designation
If you find a stamp, look for the word “Tempered” or “Safety” clearly printed within the code. These designations provide a legal guarantee that the glass has undergone the necessary heat treatment to reach its required strength levels.
Here is the deal:
- The presence of a CPSC or SGCC code confirms certified safety testing.
- Missing labels on glass in doors or showers may indicate non-compliance.
- Some stamps are hidden behind the window stop or glazing bead.
Key Takeaway: The safety bug is the most reliable and legally recognized indicator of tempered safety glass.
| Indicator | Appearance | Reliability |
|---|---|---|
| Safety Bug | Permanent etched text in corner | High |
| Compliance Code | Numeric sequences like ANSI Z97.1 | High |
| Missing Mark | No visible etching in corners | Low |
Visual confirmation of the safety stamp remains the industry gold standard for onsite glass identification.
Do You Notice Small Surface Imperfections?
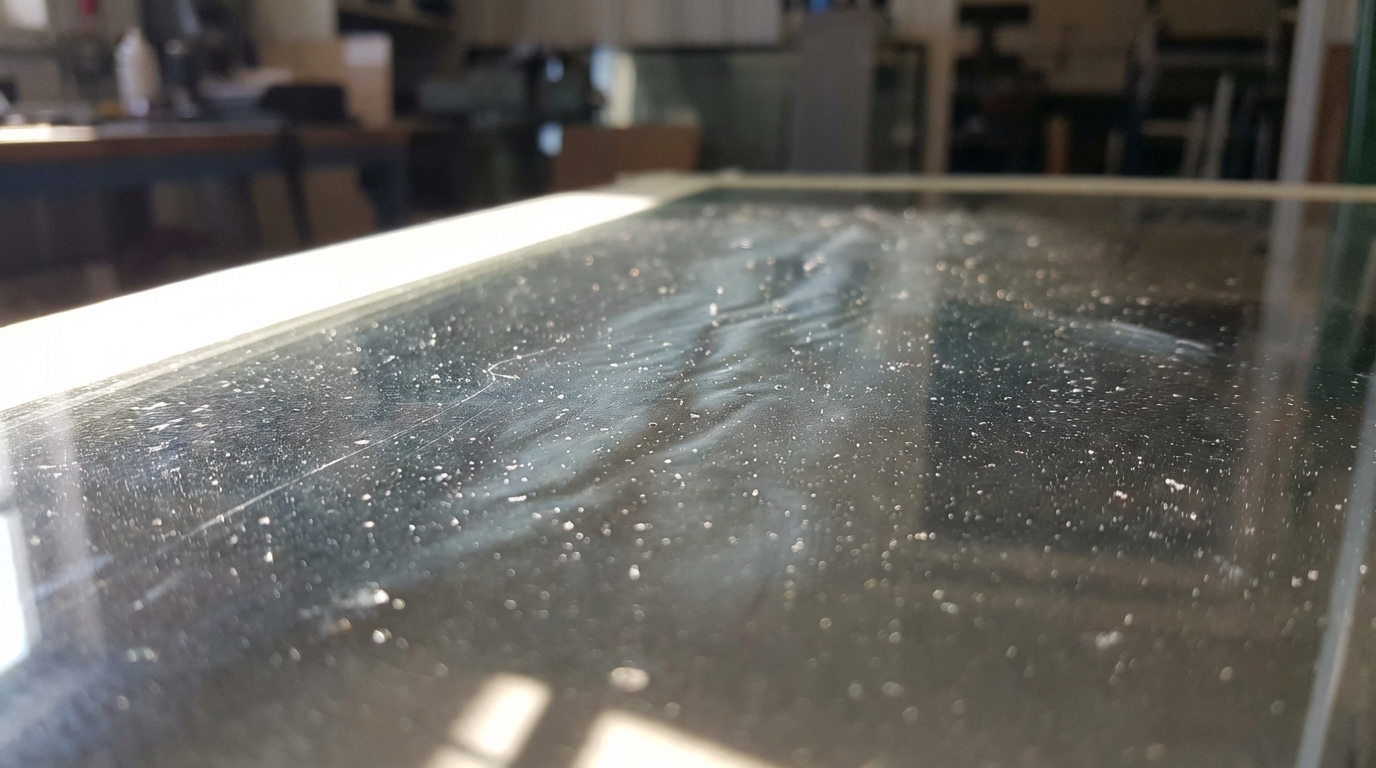
To identify tempered glass visually, you should look for microscopic pockmarks or surface “roller waves” that occur during the furnace cycle. These subtle irregularities are characteristic of the intense heating and rapid cooling stages required for safety glass.
Identifying Pockmarks and Bubbles
When you inspect the surface under intense side-lighting, you may notice tiny indentations where the softened glass touched the ceramic rollers in the tempering furnace. While modern manufacturing minimizes these, they remain a tell-tale sign of a heat-treated product.
Think about this:
- Focus your eyes on reflections to spot tiny surface dips.
- Look for areas where dust or residue tends to collect in small pits.
- Compare the texture to a known piece of standard, smooth glass.
Detecting Surface Distortion or Bowing
Because the glass is heated until it becomes slightly plastic, it can develop a minor “roller wave” distortion. If you look at the reflection of a straight line, such as a building edge or a fluorescent light, and see a slight wobble, you have likely found tempered glass.
The best part?
- Move your head side-to-side while watching a reflected vertical line.
- Check for a slight bow or curve along the center of large panes.
- Examine the glass at a 45-degree angle for the most visible distortion.
Key Takeaway: Thermal processing leaves permanent physical artifacts on the surface of the glass.
| Surface Trait | Tempered Glass | Annealed Glass |
|---|---|---|
| Texture | Micro-pockmarks possible | Perfectly smooth |
| Reflection | May show slight waves | Sharp and straight |
| Surface Stress | High compression | Low/Neutral |
Surface distortion acts as a physical fingerprint of the high-heat manufacturing environment used to create safety panes.
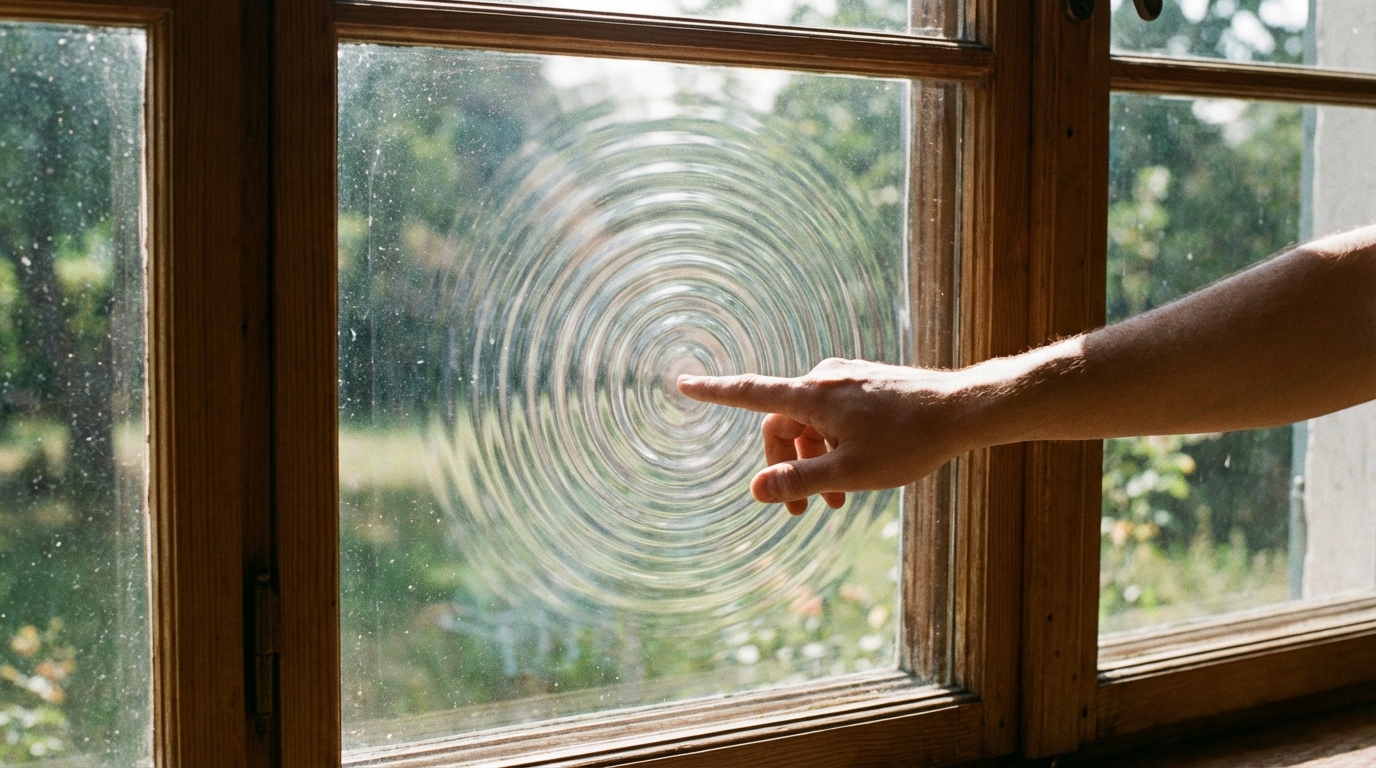
How Do Polarized Lenses Reveal Heat Patterns?
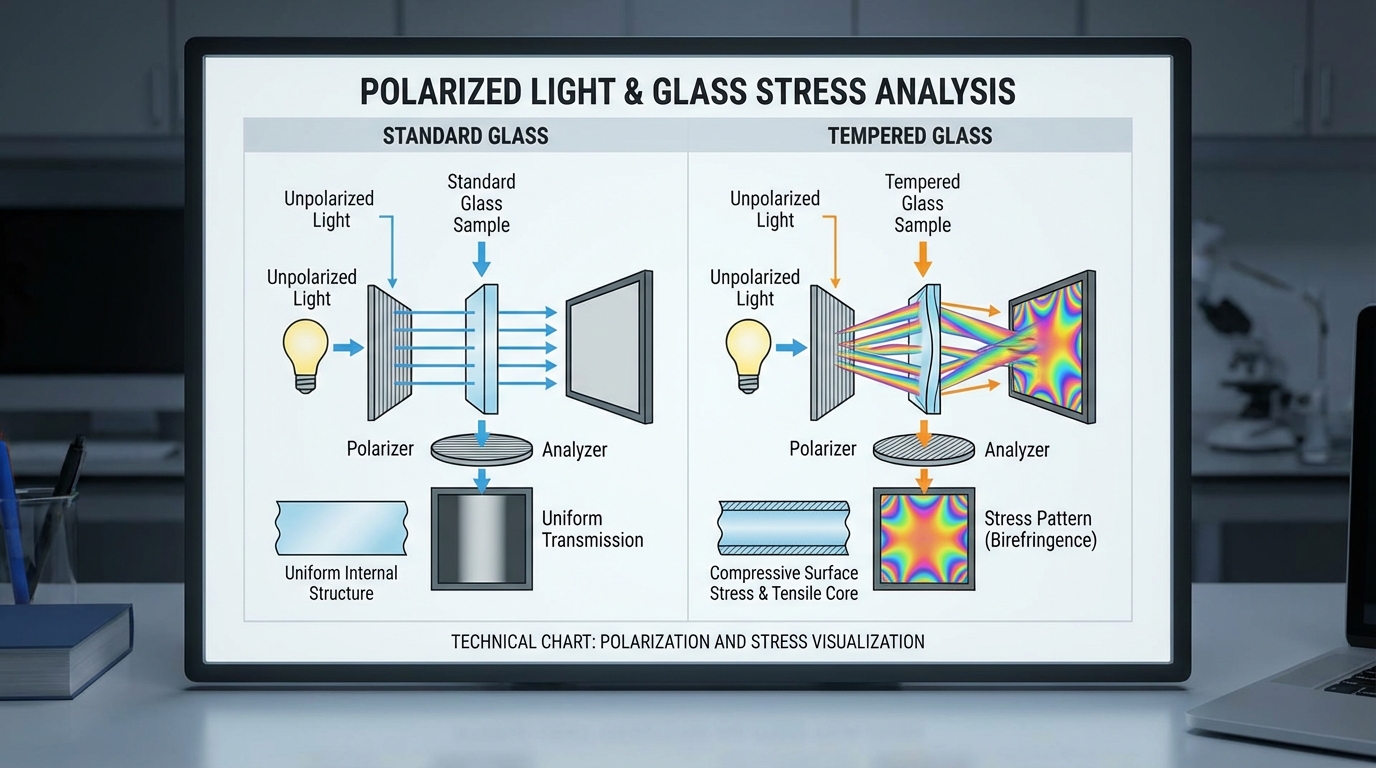
Using polarized sunglasses is a professional secret to identify tempered glass by revealing the internal stress architecture. When you view the pane through polarized film, the high-tension patterns become visible as dark spots or “leopard” stripes.
Observing the Strain Pattern
The tempering process creates varying densities within the glass structure, which causes a phenomenon known as birefringence. When you look through polarized lenses, this internal strain appears as a series of grey or dark bands across the entire surface.
But that’s not all:
- Rotate your head 90 degrees to see the pattern shift in intensity.
- Look for dark, circular spots that represent air nozzle cooling points.
- Ensure the glass is backlit by natural sky light for the best results.
Testing in Outdoor Lighting
You will find this test is most effective when the glass is situated between your eyes and a bright, uniform light source like an overcast sky. In these conditions, the strain patterns appear much more clearly than they do under standard indoor lighting.
Wait, there’s more:
- Use two polarized filters held at right angles for a laboratory-grade test.
- Check if the patterns cover the entire pane or just the edges.
- Note that regular annealed glass will remain completely clear and uniform.
Key Takeaway: Polarization reveals the “invisible” internal stress patterns created during the cooling quench.
| Test Condition | Visual Result | Conclusion |
|---|---|---|
| Polarized Lenses | Dark spots or zebra stripes | Tempered |
| Polarized Lenses | Clear, uniform view | Regular/Annealed |
| Rotation Test | Pattern changes intensity | Confirmed stress |
This non-destructive optical test provides high-certainty results without requiring special laboratory equipment.
Can You Spot Marks on the Glass Edges?
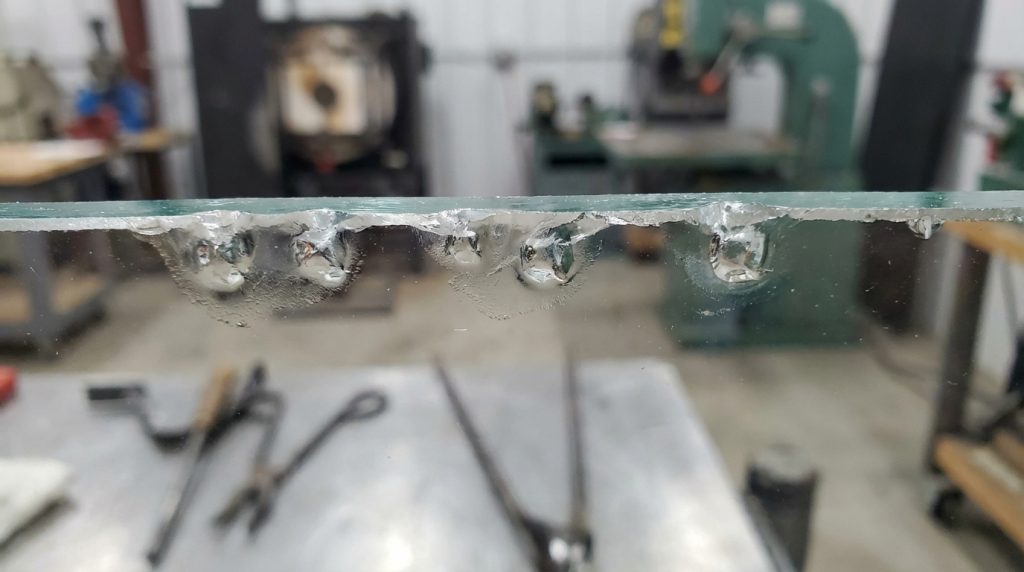
To identify tempered glass on older installations, you should look for small indentations or “slug marks” left by handling tools. These marks are often found near the top edges where tongs gripped the glass while it was soft in the furnace.
Understanding the Tong Extraction Process
Vertical tempering furnaces, common in previous decades, utilized metal tongs to suspend the glass during the heating and cooling cycles. You can often find small, circular nicks or pin-sized holes near the very edge of the pane where these tools were attached.
Here is the deal:
- Look for nicks that are uniform in size and spaced evenly.
- Inspect the top edge specifically, as this was the suspension point.
- Differentiate these from accidental chips by their smooth, rounded interiors.
Distinguishing Marks from Chips
You must be careful to distinguish between intentional manufacturing marks and accidental impact damage. Manufacturing marks occurred when the glass was molten, so they typically lack the sharp, flaky edges associated with post-installation chips.
Wait, there’s more:
- Use a magnifying glass to check for smooth, fire-polished textures.
- Look for corresponding marks on the opposite side of the pane.
- Note that modern horizontal furnaces rarely leave these specific tong marks.
Key Takeaway: Edge indentations serve as historical “fingerprints” of the tempering equipment used during production.
| Edge Feature | Cause | Indicator of Tempering |
|---|---|---|
| Tong Marks | Vertical suspension tools | Yes |
| Smooth Indents | Extraction machinery | Highly Likely |
| Jagged Flaking | Impact damage | No (Unreliable) |
While less common in new glass, tong marks remain a definitive identifier for existing architectural glazing in older buildings.
What Does the Glass Break Pattern Tell You?
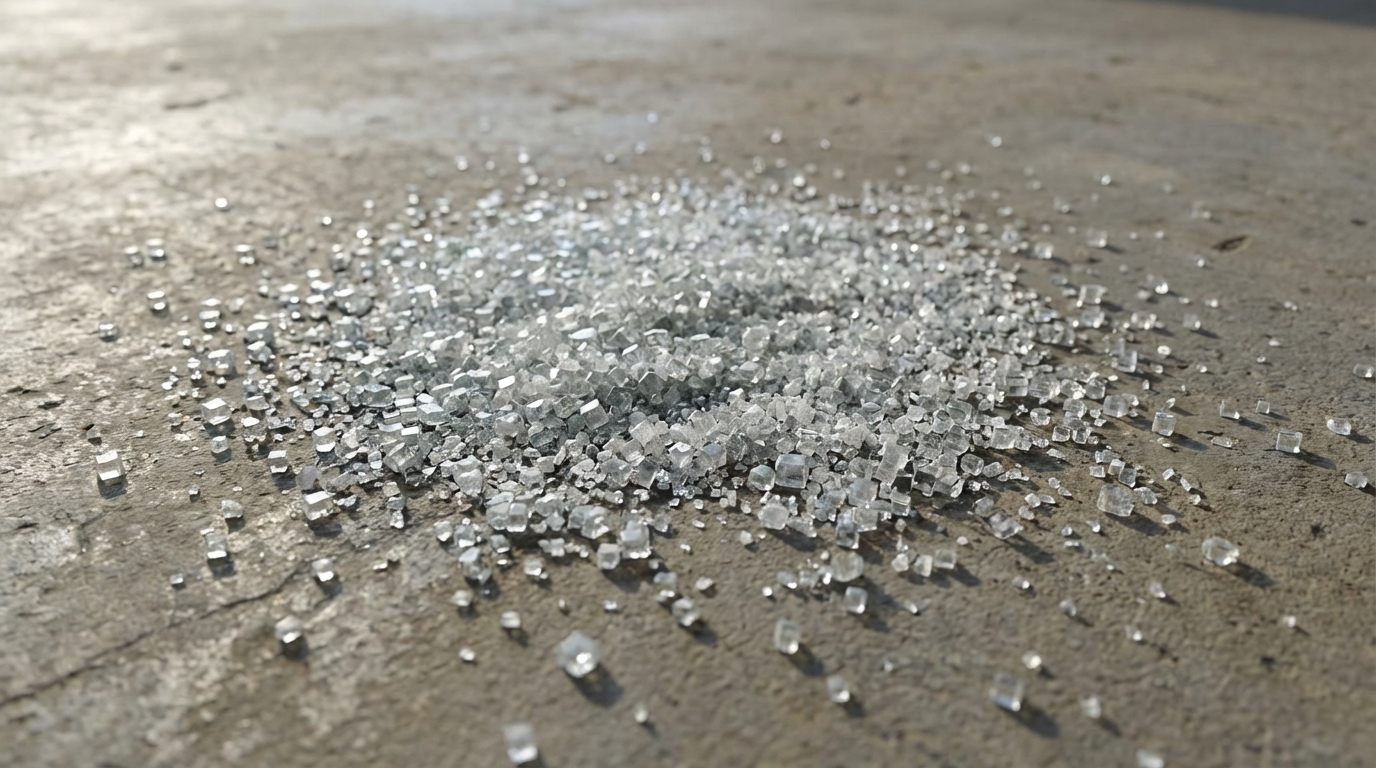
The most definitive way to identify tempered glass is by observing how the material fails when it is broken. Tempered glass is specifically engineered to crumble into thousands of small, relatively harmless granules rather than large, sharp daggers.
Analyzing Granular Fragmentation
If you are inspecting a site with existing breakage, look for small, cuboid pieces that resemble sea salt or pebbles. This fragmentation pattern is a core safety feature designed to prevent deep lacerations during a collision or building failure.
The best part?
- Pick up a shard (carefully) to check if the edges are dull.
- Look for pieces that are roughly equal in length, width, and height.
- Confirm that no large “daggers” or shards remain in the frame.
Spontaneous Breakage Characteristics
Tempered glass can occasionally shatter without any visible impact due to nickel sulfide inclusions or edge damage. When this occurs, the break origin often resembles a “butterfly” or a pair of goggles, a visual signature unique to tempered panes.
Think about this:
- Identify the center of the break pattern for a butterfly shape.
- Observe how the entire pane shatters instantly into small pieces.
- Note that annealed glass would only crack or break into a few shards.
Key Takeaway: Tempered glass “fails safely” by disintegrating into small, non-sharp granules.
| Break Type | Shape of Pieces | Safety Level |
|---|---|---|
| Tempered | Small granules/cubes | High |
| Annealed | Long, sharp shards | Low/Dangerous |
| Laminated | Cracks held by film | High |
The granular break pattern is the ultimate proof of the internal tension levels required for safety certification.
How Does Edge Finishing Differ from Regular Glass?
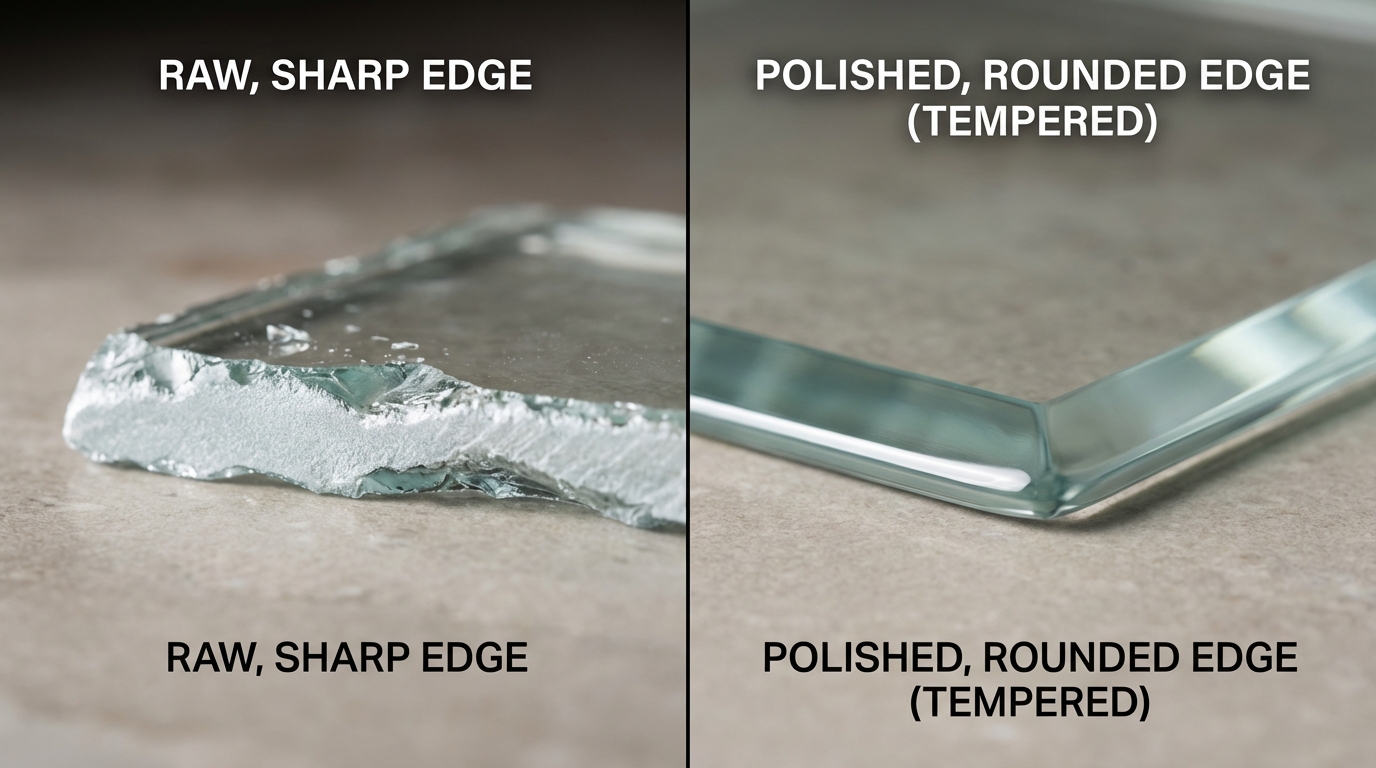
Manufacturers must finish the edges before the heating process, so you can identify tempered glass by checking for smooth, polished perimeters. Standard glass often features raw, sharp edges because it is cut to size after it has already cooled.
Recognizing Polished Safety Edges
When you run a gloved finger along the edge of a tempered pane, it should feel silky or sanded rather than sharp and jagged. Because tempered glass cannot be cut after it is strengthened, all edge work—including rounding and polishing—must be completed beforehand.
Wait, there’s more:
- Look for a slight matte or shiny finish on the thickness of the glass.
- Check if the corners are slightly rounded (chamfered) rather than square.
- Feel for any “bite” or sharpness that indicates a raw, annealed cut.
Why Edges Cannot Be Altered
You must understand that the high internal tension of safety glass prevents any post-tempering modifications. Any attempt to grind, drill, or cut the edge after it leaves the furnace will cause the entire pane to explode into granules immediately.
Here is the deal:
- Perfectly finished edges suggest the glass was custom-manufactured.
- Raw edges are a hallmark of glass that was cut from a larger sheet.
- Pre-finished edges are a functional prerequisite for the tempering furnace.
Key Takeaway: Smooth, pre-processed edges are a mandatory requirement for the tempering cycle.
| Edge Finish | Texture | Processing Stage |
|---|---|---|
| Ground/Polished | Soft, matte, or shiny | Pre-Tempering |
| Seamed | Sanded corners | Pre-Tempering |
| Raw Cut | Sharp, translucent | Post-Cut (Annealed) |
Checking for professional edge finishing is one of the fastest ways to differentiate safety panes from standard stock glass.
Does a Tap Test Produce a Unique Ringing Tone?
A simple auditory method to identify tempered glass involves listening for a clear, high-pitched ringing sound when you tap the surface. This unique acoustic property is caused by the high levels of internal compression and tension within the pane.
Listening for the High-Frequency Ring
When you gently strike a tempered pane with a small metal object or your knuckle, it typically produces a musical “ping” that vibrates for a longer duration. This happens because the compressed surface layers transmit sound waves more efficiently than regular, untensioned glass.
But that’s not all:
- Compare the sound to a known piece of regular glass if possible.
- Use a light, consistent tapping force to avoid accidental damage.
- Listen for the clarity of the tone rather than just the volume.
Reliability Constraints of Sound Testing
You should use the tap test only as a secondary confirmation, as the sound can be muffled by thick rubber gaskets or heavy window frames. A tightly mounted pane may produce a duller sound regardless of its tempering status, leading to potential confusion.
Wait, there’s more:
- Test the center of the pane for the most accurate acoustic response.
- Be aware that double-glazed units will produce a more complex echo.
- Always follow up a tap test with a visual check for safety stamps.
Key Takeaway: Internal tension allows tempered glass to vibrate at a higher, clearer frequency.
| Glass Type | Sound Produced | Vibration Quality |
|---|---|---|
| Tempered | Sharp “Ping” or Ring | Sustained |
| Annealed | Dull “Thud” | Brief |
| Double Glazed | Muffled Echo | Complex |
While not foolproof, the tap test provides a quick indicator of internal stress for experienced professionals.
What are the Safety Building Code Requirements?

In 2024, building codes strictly mandate where you must identify tempered glass to protect occupants. Any glass located in doors, shower enclosures, or near floor-level traffic zones is typically required by law to be safety-grade material.
Identifying Mandatory Hazard Locations
You should expect to find tempered glass in any area defined as a “hazardous location” by the International Building Code (IBC). This includes panes within 24 inches of a door or any window with a bottom edge less than 18 inches above the floor.
Think about this:
- Check all sliding or swinging glass doors for safety stamps.
- Verify glass in gymnasiums or public corridors where impact is likely.
- Look for safety glass in skylights and overhead glazing applications.
Compliance with International Standards
International safety standards like ASTM C1048 ensure that all tempered glass used in construction meets minimum impact resistance thresholds. If you are inspecting a modern commercial building that has passed recent safety audits, the glass in high-risk zones is almost certainly tempered.
The best part?
- Compliance ensures your building remains insurable and legally protected.
- Professional manufacturers provide certificates of compliance for every batch.
- Modern codes are updated frequently to reflect new safety technologies.
Key Takeaway: High-risk architectural zones are legally required to use tempered safety glass by international codes.
| Location | Requirement | Reason |
|---|---|---|
| Swinging Doors | Mandatory | High impact risk |
| Shower Stalls | Mandatory | Slip and fall hazard |
| Low Windows | Mandatory | Foot traffic safety |
Understanding code requirements helps you narrow down which panes in your facility are most likely to be tempered.
How Do Industry Standards Define Quality?
Quality manufacturers follow rigorous industrial protocols to ensure they produce glass that you can easily identify tempered glass by its strength and durability. These standards govern everything from the furnace temperature to the air pressure used during the cooling quench.
Adhering to ASTM and EN Specifications
Certified manufacturers operate under standards like ASTM C1048, which specifies the required surface compression levels for safety glass. This ensures that every pane can withstand significantly higher mechanical and thermal stress than standard annealed alternatives.
Wait, there’s more:
- Manufacturers test for fragmentation density to ensure safety.
- Surface compression must typically range between 10,000 and 15,000 psi.
- Batch records are kept to trace the quality of the thermal treatment.
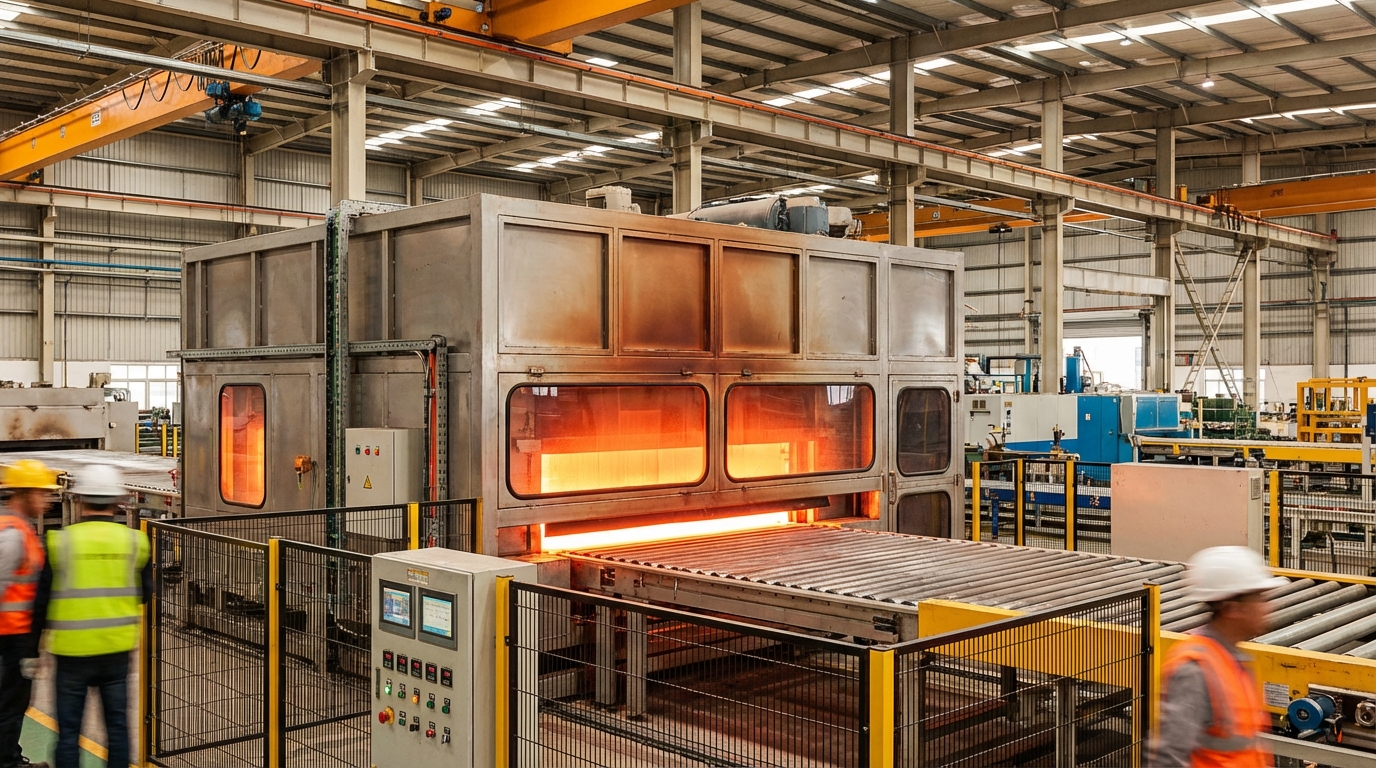
The Role of Rapid Cooling (Quenching)
The strength of the glass is determined during the “quench” stage, where high-pressure air blasts the hot glass surface. This rapid cooling creates the outer compression layers that give the glass its safety properties and distinctive polarized patterns.
Here is the deal:
- Proper quenching prevents the glass from becoming brittle or uneven.
- Uniform cooling minimizes the visual distortion or “roller waves.”
- Quality control technicians monitor the air pressure at every nozzle.
Key Takeaway: Certified manufacturing processes ensure that glass meets global safety and strength benchmarks.
| Quality Metric | Standard Range | Importance |
|---|---|---|
| Surface Compression | 10k – 15k PSI | Impact resistance |
| Edge Compression | > 9,700 PSI | Edge durability |
| Fragmentation | > 40 particles per 50mm | Safety break pattern |
Strict adherence to industrial standards guarantees that the glass will perform as expected during a critical failure.
Is DIY Testing Better Than Professional Inspection?
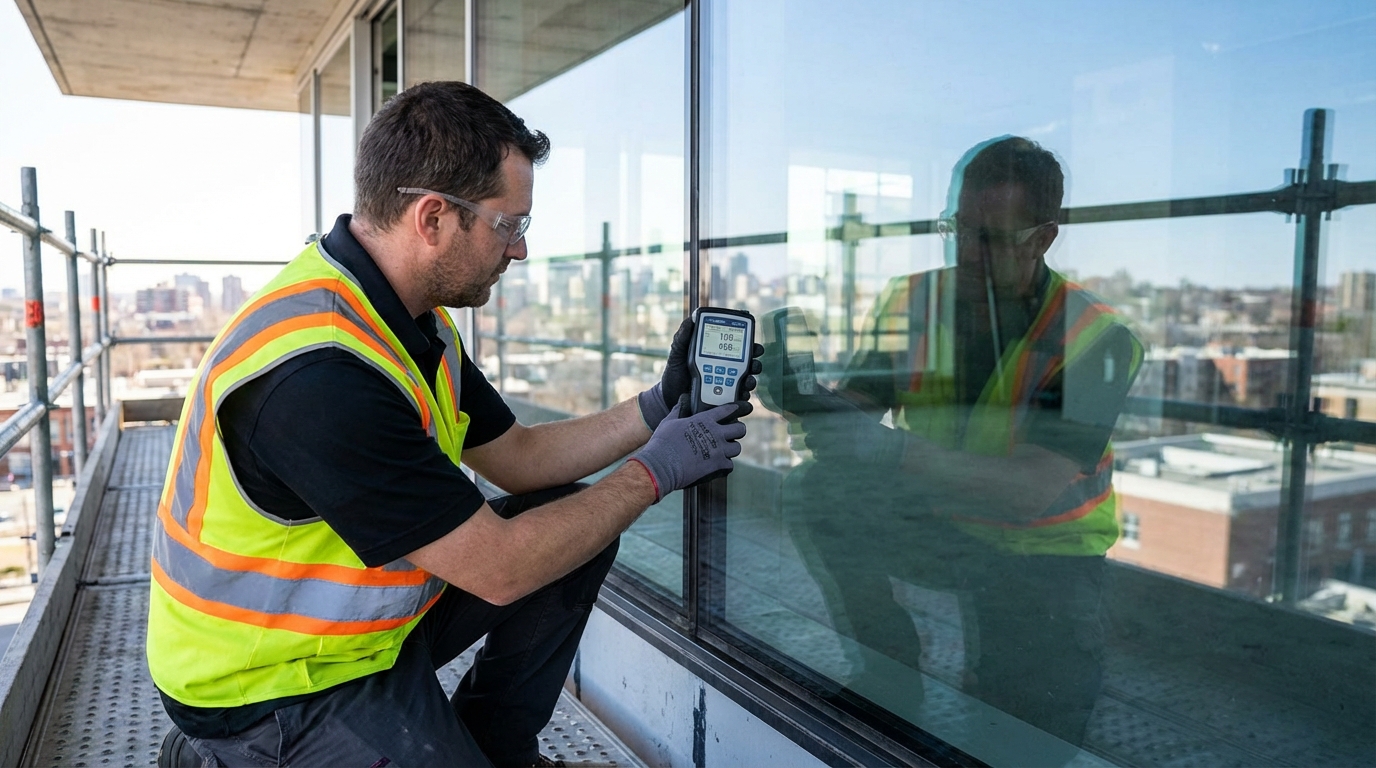
While you can use simple tests to identify tempered glass, professional inspections offer a level of certainty that manual checks cannot match. Experts use digital thickness gauges and electronic tempering meters to verify glass types without risking any surface damage.
Limitations of Home Testing Methods
DIY methods like the tap test or polarized lens check are excellent for quick field assessments but are not 100% foolproof. Factors like glass thickness, mounting pressure, and ambient light can skew your results, potentially leading to a dangerous misidentification.
But that’s not all:
- Human error can miss faint safety stamps or subtle surface waves.
- Some specialty coatings can hide polarized patterns from basic lenses.
- Only digital tools can provide a definitive psi (pressure) reading.
When to Hire a Glazing Expert
If you are managing a large commercial project or an insurance audit, you should hire a professional glazier for a certified inspection. They provide documented reports that confirm your facility’s compliance with the latest safety and building codes.
Wait, there’s more:
- Experts can identify glass types in complex, multi-layered units.
- Digital inspections are faster for buildings with hundreds of panes.
- Professional reports serve as legal evidence of safety compliance.
Key Takeaway: Professional digital tools provide a level of certainty that manual visual checks cannot match.
| Method | Accuracy | Cost |
|---|---|---|
| Visual Check | Moderate | $0 |
| Polarized Test | High | $20 (Lenses) |
| Digital Meter | Excellent | Professional Fee |
Investing in a professional assessment ensures that your project meets all regulatory requirements and safety standards.
Secure Your Project with Certified Safety Glass
Ensuring your facility is equipped with the correct safety materials is the only way to prevent catastrophic injuries and legal liabilities. By mastering these five identification techniques, you can confidently verify the glass types within your building and ensure every new installation meets 2024 safety standards. Our mission is to provide precision-engineered glass solutions that eliminate project delays and quality inconsistencies, giving you complete peace of mind from blueprint to installation.
If you have questions about your specific glazing needs or require high-performance materials for your next development, contact us today for expert manufacturing guidance and a free technical review of your requirements.
Frequently Asked Questions
Can I tell if glass is tempered by its thickness?
Not reliably. While tempered glass is often 1/4 inch thick or more, standard annealed glass is also manufactured in those same thicknesses for various industrial uses.
What is the best way to see the leopard spots?
You should view the glass through polarized sunglasses while standing outdoors under an overcast sky or a bright, uniform light source.
How do I know if the glass in my door is safe?
The most direct way is to look for a permanent etched safety stamp in one of the corners that explicitly states “Tempered” or “Safety Glass.”
Can tempered glass be cut if I have the right tools?
No. Any attempt to cut, drill, or grind the glass after it has been tempered will cause the entire pane to shatter instantly into small granules.
Is the tap test 100% accurate?
No, because the sound can be significantly altered by how the glass is held in the frame or the type of sealant used around the edges.